

Homemade apple cider is a delightful, aromatic beverage that brings warmth to any occasion. Whether you want to sip it hot on a chilly fall evening or serve it cold for a refreshing treat, homemade apple cider is incredibly easy to make. In this guide, we’ll walk you through everything you need to know: from choosing the right apples and spices to the step-by-step process of creating a batch of delicious cider. Plus, we’ll share some great tips and variations to make your cider even more special. Let’s get started!
Table of Contents
Introduction to Homemade Apple Cider
What is Homemade Apple Cider?
Homemade apple cider is a warm, comforting drink made by boiling fresh apples, water, sugar, and spices together. Unlike store-bought juice, it’s rich in flavor, and you can adjust the sweetness and spice levels to your preference. The process of making your own cider at home might take a bit of time, but the end result is absolutely worth it! Whether you’re looking to enjoy the crispness of apples or simply want to warm up your kitchen with the scent of cinnamon, homemade apple cider is the answer.
Benefits of Homemade Apple Cider
Why settle for store-bought cider when you can create your own? One of the major benefits of homemade apple cider is that you have total control over the ingredients. You can choose organic apples, adjust the amount of sugar, and spice it up exactly how you like. Additionally, homemade cider is free from preservatives and artificial flavoring, which makes it not only tastier but healthier too. Plus, making apple cider at home is a fun way to celebrate the changing seasons and gather with friends or family.
Ready to dive deeper into the ingredients needed for your homemade apple cider? Keep reading as we explore the essential elements to create the perfect batch!
Ingredients Needed for Homemade Apple Cider
Making your own homemade apple cider is incredibly simple when you know the right ingredients to use. By choosing fresh, quality apples and the right spices, you can craft a drink that’s perfectly tailored to your taste. Let’s go over the key ingredients that will make your cider a true standout!
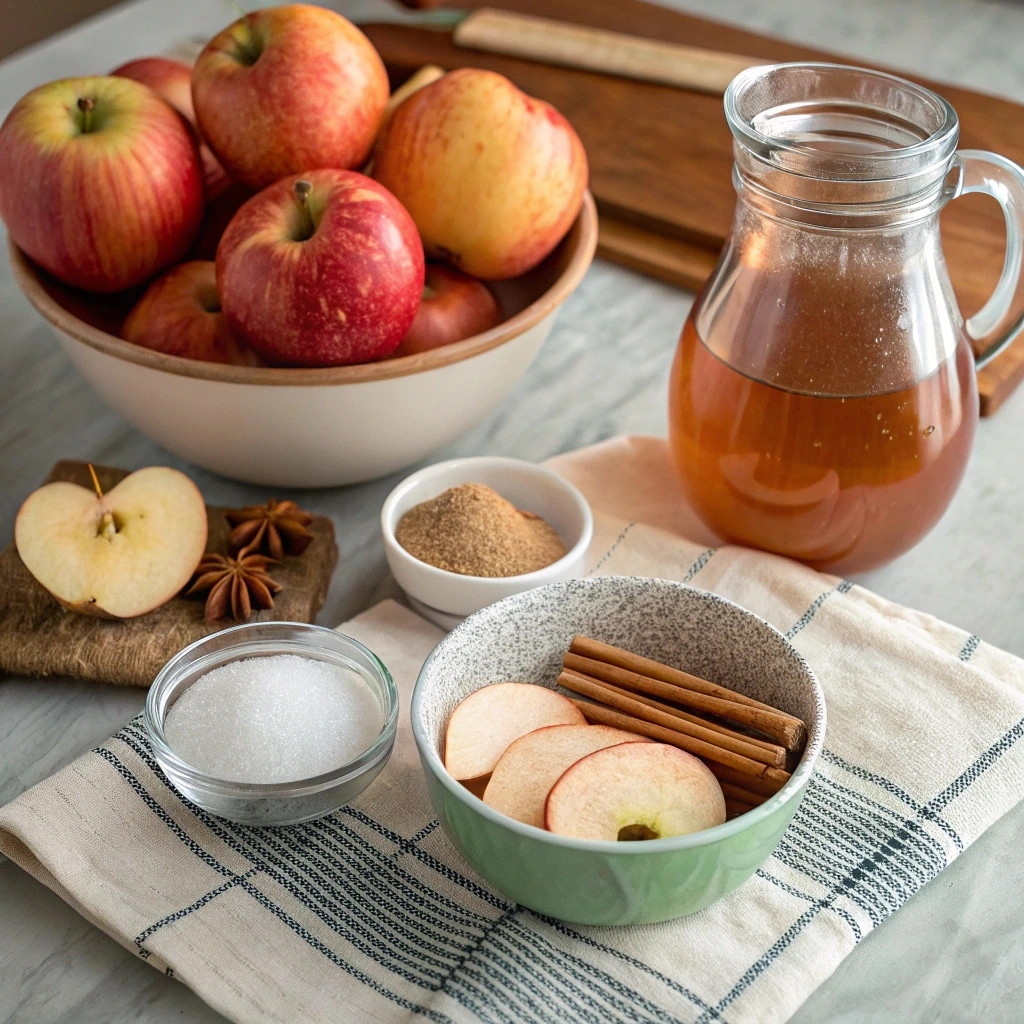
Essential Ingredients for Apple Cider
The basic components you’ll need for homemade apple cider are apples, water, sugar, and spices. These ingredients come together to create a sweet and flavorful base. To make your cider just right, be sure to use fresh ingredients. While the recipe is flexible, these ingredients are a must-have for a delicious cider that will have everyone asking for seconds.
| Ingredient | Quantity | Description |
|---|---|---|
| Apples | 10 large apples | Choose your preferred variety: Gala, McIntosh, or Fuji. |
| Water | Enough to cover apples | Add enough water to fully submerge the apples in the pot. |
| Sugar | ¾ cup white sugar | Sweeten to taste; adjust according to the apple variety. |
| Ground Cinnamon | 1 tablespoon | Adds warm, comforting flavor. |
| Ground Allspice | 1 tablespoon | Complements cinnamon for a spicy, aromatic cider. |
Best Apples for Homemade Apple Cider
When it comes to selecting apples for your homemade apple cider, the variety you choose will influence the final taste. For example, sweeter apples like Gala, Fuji, or Honeycrisp provide a smoother, more delicate cider. On the other hand, tart apples like Granny Smith or McIntosh bring a sharp, tangy flavor that balances the sweetness of the sugar. If you want the best of both worlds, consider combining sweet and tart apple varieties.
However, the type of apples you select should align with your taste preference. Homemade apple cider is so versatile that experimenting with different varieties can lead to some truly unique flavors. Don’t be afraid to mix things up!
Step-by-Step Guide to Making Homemade Apple Cider
Now that you’ve gathered your ingredients, it’s time to get down to business! Making homemade apple cider is a relatively straightforward process, but the key is to allow enough time for all the flavors to meld together. Let’s walk through the step-by-step guide on how to make this warm, comforting drink.
Step 1: Preparing the Apples
Before you start the cooking process, wash the apples thoroughly to remove any dirt or pesticide residue. After that, you’ll need to core and quarter the apples. The good news is that you don’t need to peel them — the skin adds color and flavor to your cider! Once the apples are prepped, place them in a large stockpot. You can use a variety of apples, depending on your flavor preference, but using a mix of sweet and tart apples will give your cider the perfect balance.
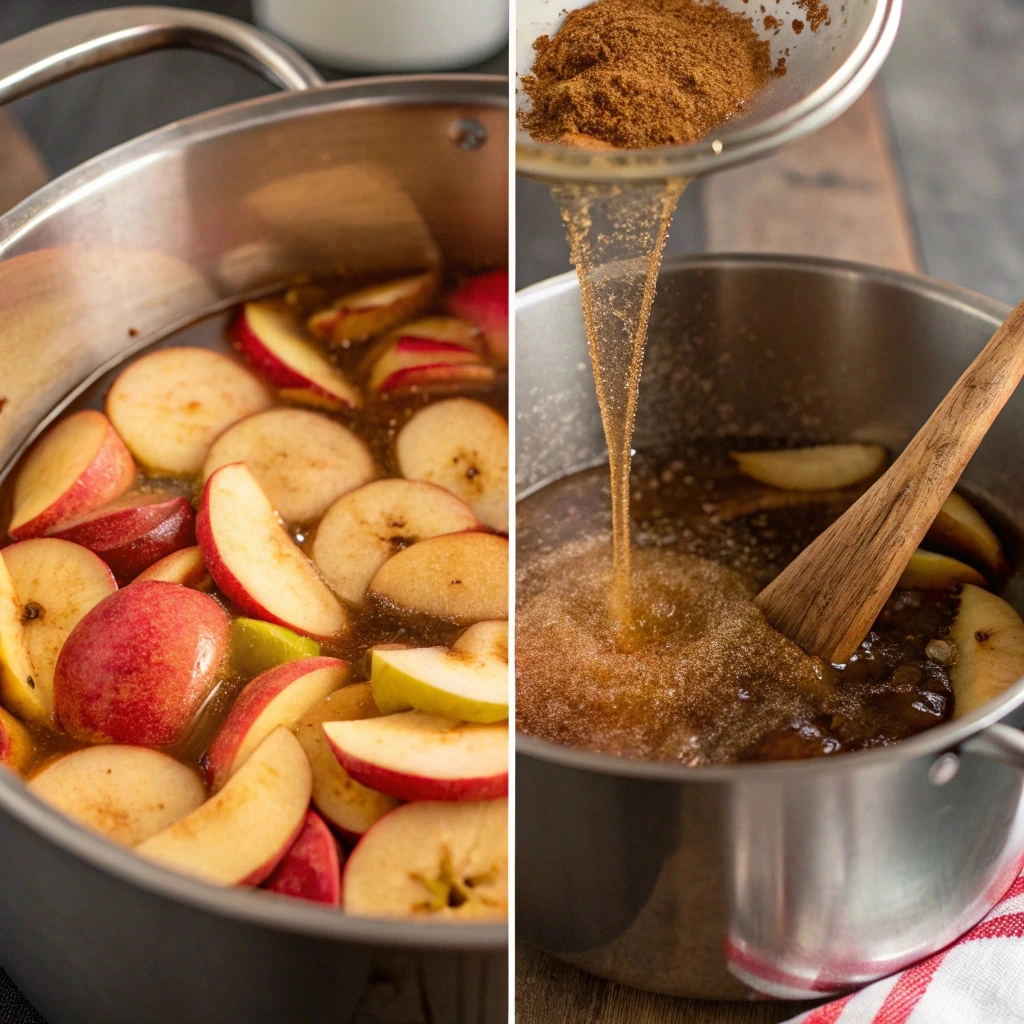
Step 2: Boiling the Apples
Add enough water to the pot to cover the apples by about 2 inches. Stir in the sugar, cinnamon, and allspice. Bring the mixture to a boil over medium-high heat, stirring occasionally. The boiling process is crucial because it helps release the natural flavors of the apples and spices. Once it starts to boil, reduce the heat and let it simmer for 1 hour.
Step 3: Simmering the Cider
After boiling, it’s time to simmer the cider. Lower the heat to low, cover the pot, and let it cook for an additional 2 hours. During this simmering phase, the apples will soften, and the spices will infuse the cider, making it rich and aromatic. You’ll want to check on it occasionally to make sure there’s enough liquid, and you may need to add a little more water to maintain the right consistency.
Step 4: Straining the Mixture
Once the simmering is done, it’s time to strain your homemade apple cider. Set up a fine-mesh sieve over a large bowl or another pot, and pour the cider mixture through it. You can discard the solids or use them for making apple butter. For a clearer cider, you may want to strain it once more using cheesecloth. This will give you a smooth, flavorful liquid free from pulp and seeds.
Step 5: Adjusting the Flavor
Taste your cider and see if it needs any adjustments. If it’s too sweet, you can add a little more water. If it’s not sweet enough, a small amount of sugar or honey can bring it up to your liking. You can also adjust the spices by adding more cinnamon or allspice if you want a stronger flavor. Remember, the beauty of homemade apple cider is that you’re in control of the taste!
Now that your cider is prepared, you can serve it hot or cold depending on your preference. Don’t forget to garnish with a cinnamon stick or a slice of apple for an added touch of flavor and visual appeal!
Storing and Preserving Homemade Apple Cider
After all the effort of making your own homemade apple cider, you’ll want to make sure you store it properly to preserve that delicious flavor. Whether you plan to enjoy it immediately or save it for later, there are several ways to store your cider, so you can enjoy it fresh for days or even months. Let’s explore the best storage methods.
How to Store Fresh Cider
Once your homemade apple cider has cooled down, store it in a tightly sealed container. Glass jars or pitchers are perfect for keeping the cider fresh in the fridge. Ideally, you’ll want to consume the cider within a week if it’s kept in the refrigerator. Be sure to check for any signs of spoilage, such as unusual smells or changes in taste. As a result, it’s important to consume your fresh cider soon after making it to fully enjoy its flavor.
Can You Freeze Homemade Apple Cider?
Freezing your homemade apple cider is a great way to extend its shelf life. Pour the cooled cider into freezer-safe containers, leaving a little space at the top to allow for expansion as the liquid freezes. For convenience, you can freeze the cider in smaller portions, so you can thaw only what you need. Frozen cider can last for up to one year. When ready to enjoy, simply thaw it in the refrigerator or heat it up on the stove. This way, you can savor the fresh taste of autumn even during the off-season.
Canning Apple Cider for Longer Shelf Life
If you want to store your cider for even longer, canning is a great option. Canning allows you to keep your homemade apple cider on the shelf for several months. To do this, pour the hot cider into sterilized jars, leaving about half an inch of headspace. Seal the jars with lids and process them in a hot water bath for around 10-15 minutes to ensure they’re sealed properly. This method preserves the cider while keeping it fresh, allowing you to enjoy your homemade cider throughout the year.
Variations of Homemade Apple Cider
While homemade apple cider is already delicious on its own, there are plenty of ways to customize it to suit your taste. From spiked versions to fruit-infused twists, let’s dive into some creative variations that will make your cider experience even more enjoyable.
Spiked Apple Cider
For those who enjoy a little extra warmth in their cider, spiking it with alcohol is a fantastic way to elevate the drink. You can add a splash of bourbon, rum, or brandy to your hot cider for a cozy, adult-friendly version. The rich flavors of the alcohol pair beautifully with the spices in the cider, adding depth and warmth to each sip. Simply pour your homemade cider into a mug and add your favorite spirit — stir and enjoy the perfect fall or winter treat!
Apple Cider with Other Fruits
You can also experiment with different fruits to give your cider a unique twist. For example, adding orange slices or zest to your homemade apple cider can introduce a citrusy note that brightens the flavor. Cranberries, pears, and even pomegranates can also be added to your cider for a fruity flair. Simply add the fruits to the pot during the simmering process, and let them infuse their flavors into the cider. As a result, you’ll have a delightful cider that’s not only full of apple goodness but also bursting with vibrant fruit notes.
Hot vs. Cold Apple Cider
Another fun way to enjoy homemade apple cider is by serving it either hot or cold. Hot apple cider is perfect for cozying up on a chilly evening, offering a comforting, spiced drink. On the other hand, cold apple cider is incredibly refreshing, especially during warm weather. For a cold version, let the cider cool completely after straining, then serve it over ice. You can even garnish it with apple slices or a cinnamon stick to add a festive touch.
Sugar-Free and Low-Sugar Cider Options
For those who prefer a lighter, less sweet version of homemade apple cider, reducing the sugar is a great option. You can easily cut back on the sugar, or substitute with a natural sweetener like honey or maple syrup. Additionally, you can use a combination of sweet and tart apples to maintain the natural sweetness of the cider without relying too much on sugar. This variation is perfect for those watching their sugar intake but still craving the flavors of fresh, homemade cider.
For more delicious recipes, check out our other refreshing drink ideas like this Fresh Orange Juice Recipe.
Troubleshooting Common Apple Cider Problems
While making homemade apple cider is relatively simple, there are a few common issues you might encounter along the way. Don’t worry, though! These problems are easy to fix with a few adjustments. Let’s explore some of the most frequent challenges and how to solve them, so your cider turns out perfect every time.
Too Sweet or Too Tart?
One of the most common issues when making homemade apple cider is finding the right balance of sweetness and tartness. If your cider is too sweet, it’s likely due to the apples you’ve chosen or the amount of sugar you’ve added. To fix this, you can dilute the cider with a bit of water to tone down the sweetness. On the other hand, if your cider is too tart, try adding a little more sugar or honey to balance out the flavors. Remember, the beauty of homemade cider is that you have total control over the flavor, so feel free to experiment until you get it just right.
Cider Tastes Bland
If your homemade apple cider tastes a little lackluster, it’s probably because the spices haven’t had enough time to infuse the cider fully. You can try simmering the cider for a bit longer to allow the flavors to deepen. Additionally, don’t be afraid to add a bit more cinnamon, nutmeg, or even cloves to bring more warmth and complexity to your cider. If you like a more intense spice profile, consider adding a few whole cinnamon sticks or allspice berries during the simmering process.
Cider is Too Watery
Sometimes, homemade apple cider can end up too watery if the apples lose too much moisture during cooking, or if you’ve added too much water to the pot. If this happens, try simmering the cider uncovered for a longer period of time to reduce it and concentrate the flavors. Alternatively, you can add more apples to the pot to help thicken the cider naturally. A good rule of thumb is to aim for about 1 to 1.5 gallons of cider for every 10 to 12 apples, adjusting the liquid content as needed to achieve your desired consistency.
Creative Uses for Leftover Apple Cider
Once you’ve made your homemade apple cider, you might find that you have some leftover cider or leftover apple pulp. Instead of discarding it, there are plenty of creative ways to make the most of these leftovers. Let’s dive into some fun, delicious ideas for using your leftover cider and apple pulp.
Apple Cider Vinaigrette
Leftover homemade apple cider can be transformed into a tangy salad dressing. Simply combine a few tablespoons of cider with olive oil, a teaspoon of Dijon mustard, and a drizzle of honey. Whisk the mixture together until it emulsifies, then season with salt and pepper to taste. This cider-based vinaigrette adds a delightful, fruity kick to any salad, making it the perfect complement to roasted vegetables or a leafy green salad.
Apple Cider Syrup
If you have extra cider, why not turn it into apple cider syrup? To make syrup, pour your leftover cider into a saucepan and simmer it over low heat until it thickens and reduces by half. You’ll end up with a sweet, flavorful syrup that’s perfect for pancakes, waffles, or even drizzling over roasted fruits. The rich flavor of apple cider syrup is a real treat and a great way to savor the season even longer.
Apple Cider Marinade
Another great way to use leftover homemade apple cider is by turning it into a marinade for meats, especially pork or chicken. The cider’s natural sweetness pairs beautifully with these meats, infusing them with a subtle, fruity flavor. Combine the cider with a bit of olive oil, garlic, herbs, and spices, and let your meat marinate for a few hours before cooking. This will result in a juicy, flavorful dish that’s sure to impress.
For more ideas on how to make the most of your leftover apple cider, check out our recipe for Homemade Chow Chow.
Health Benefits of Homemade Apple Cider
Not only is homemade apple cider a delicious treat, but it also offers a variety of health benefits. From providing essential nutrients to promoting digestion, this comforting drink can be a great addition to your diet. Let’s explore the ways that homemade apple cider can contribute to your overall well-being.
Nutritional Value of Homemade Apple Cider
Homemade apple cider is packed with beneficial nutrients, especially if you make it from fresh apples. Apples themselves are a great source of fiber, vitamin C, and antioxidants, all of which play a crucial role in supporting a healthy immune system. The natural sugars in the cider also provide a quick energy boost, making it a great drink to enjoy after a workout or when you need a pick-me-up during the day. In addition to these benefits, cider is low in fat and cholesterol, making it a heart-healthy option.
Apple Cider for Digestion
One of the key benefits of homemade apple cider is its potential to aid digestion. The high fiber content in apples can help regulate digestion and promote regular bowel movements. Additionally, apple cider contains organic acids like malic acid that may help detoxify the liver and improve overall digestive function. For those who suffer from indigestion or bloating, sipping on warm cider can provide soothing relief, making it a natural remedy to incorporate into your daily routine.
Detoxifying Properties of Apple Cider
Homemade apple cider is also believed to have detoxifying properties. The antioxidants in apples help fight free radicals in the body, while the acids in cider can support kidney and liver function, aiding in the removal of toxins. By drinking apple cider regularly, you’re helping your body detoxify in a natural and gentle way. Additionally, apple cider’s high water content can help flush out excess waste and prevent dehydration, which is essential for overall health.
FAQs About Homemade Apple Cider
Now that you know how to make the best homemade apple cider and all the creative ways to enjoy it, let’s tackle some of the most common questions people have about this delicious drink. Whether you’re new to making cider or a seasoned pro, we’ve got the answers to your burning questions.
Can I make apple cider without an apple press?
Yes, you can definitely make homemade apple cider without an apple press. While an apple press can make the process easier, it’s not necessary. Instead, you can use a large stockpot to boil your apples and then strain the mixture through a fine mesh sieve or cheesecloth. This method still yields delicious, flavorful cider without the need for specialized equipment.
What are the best apples for cider?
When making homemade apple cider, the type of apples you use greatly influences the taste. For a sweeter cider, go for apples like Gala, Fuji, or Honeycrisp. If you prefer a more tart cider, opt for apples like Granny Smith, McIntosh, or Braeburn. Many cider makers recommend using a blend of sweet and tart apples to achieve a balanced flavor that’s both refreshing and rich.
How long does homemade apple cider last?
If you store your homemade apple cider properly, it can last for up to a week in the refrigerator. If you want to store it for a longer period, you can freeze the cider or can it for long-term preservation. When freezing, be sure to leave some space in the container for expansion, and if canning, follow proper safety guidelines to ensure the cider stays sealed.
Can I make apple cider without sugar?
Absolutely! You can make a sugar-free or low-sugar version of homemade apple cider by simply reducing or eliminating the sugar from the recipe. The apples themselves provide natural sweetness, so you may find that you don’t need as much added sugar. You can also substitute the sugar with natural sweeteners like honey or maple syrup, depending on your preferences.
What should I do with the leftover apple pulp?
After straining your homemade apple cider, you may have leftover apple pulp. Instead of throwing it away, you can use it to make apple butter, applesauce, or even compost it for your garden. The pulp is packed with nutrients, so it’s a great way to avoid waste and make the most out of your apples.